Testing a blog post using my new Android! And thought I'd upload a photo of the chillies harvested from the backyard. Photo taken using Android camera phone too. I think I prefer this over blackberry to be honest!
Saturday, February 18, 2012
Sunday, January 22, 2012
Sorbet Specials
Yes, still excited with the new toy (the Sunbeam Gelateria), I set off in creating ice cold treats, perfect for the weather - good 'ol Melbourne summer. I wanted to make sure that the sorbets generated from this machine will benefit from the the harvests from the garden... Too bad I killed the stevia otherwise I could have skipped adding store bought sugar too... but anyway...
After the successful lemon and mint sorbet, I thought future desserts for entertaining would be best served from the ice cream machine! One Sunday we had some friends over for dinner who really liked their chocolate, so the treat of the night was chocolate inspired. After a little googling of recipes for inspiration, I stumbled upon a chocolate and rosemary sorbet recipe (which is apparently under the Moroccan desserts department). Curious, I thought I'd give it a go. A bit risky to serve an untested recipe to guests, but worst case I thought the back up plan would be store bought chocolate ice cream!
It's also very easy to make. All you need are
2 sprigs rosemary, bruised (I just bashed the stems with a pestle)
60g coco powder - I used Cadbury
500ml water
Place all ingredients in a saucepan and simmer until the sugar melts. Bring to a boil for a bout a minute or two, stirring occasionally. Take the pan off the heat and let the rosemary steep into the mixture - I kept tasting every 15minutes just to check for the intensity of the rosemary as I really wasn't sure what to expect! I left both sprigs until the mixture has cooled, took the sprigs off and churned the mixture in the ice cream maker. Done! I served the sorbet with a chocolate bark, simply made by melting 200g of 70% dark chocolate and poured on top of chopped dried apricots, pistachios and sultanas.
although I probably have to improve my scooping skills to have a more perfectly shaped sorbet!
Meanwhile, the plums in the backyard have been flourishing, and this time around we have been harvesting more than we can consume as the possums cannot take their share - husband has draped bird netting over the plum tree - lesson learned from last year's disaster when the possums raped the tree and only left pips.
Some of the plums were big, some were small and cute, but all of them were tasty. Well, at least to me!
So I took about 800g worth of plum flesh (left the skin on), added the juice and zest of half a HUGE lemon (also from the backyard). The ice cream machine's capacity is 1 litre, and because the mixture will expand, the ingredients are not supposed to exceed 850mls.
It went into a blender with about 3/4 cup of caster sugar and 2 tablespoons of brown sugar. I really wasn't sure about the final white sugar measurements as I didn't want to add much sugar, and I started with 1/2 cup and just kept adding a touch here and there until I thought about adding brown sugar just for a bit more depth in the sweetness. At this point I was debating as to add any spice... my hands were twitching and itching to reach out into the pantry for something like star anise or aniseed... Then I opened the door of the drinks cabinet... and thought, hmmmm... Ouzo maybe?
Since alcohol deters freezing, the alcohol had to be added later in the process. After passing the blitzed red mixture through a sieve, it went to the ice cream machine, and then I just stirred in 2 capfuls of Ouzo when it was almost done and placed the mixture into a freezer safe container.
The next concoction is a kaffir lime and lemon verbena sorbet... Twelve bruised kaffir limes, nine leaves from the lemon verbena, 1 dried chili (just to intensify the taste), 1 cup sugar and 2.5 cups of water were boiled and left to cool to infuse. I find the taste very interesting!
let the flavors mingle
I could keep going for a while so please bear with me as I get a slight obsession with this machine! Still thinking about the next set of flavors to experiment with.... Something along the lines of thyme plus maybe something with alcohol... stay tuned!
The Huntsman
Had a surprise guest today at the shower. Unfortunately he had to be put down...
...And the bath sponges replaced!
Monday, January 9, 2012
Sunday, January 8, 2012
Lemon and Mint Sorbet
So! It's been around 2 months since my last post, and I have a very good reason why I was pre-occupied with something else! Anyway, for the first post for this year I thought I'd show off a little toy, a gift from colleagues.
I've always wanted an ice cream maker and was actually contemplating on getting a Cuisine Art ice cream maker so getting something very similar (if not better!) was much appreciated.
So, of course it had to be tested!
Incidentally there was a bunch of lemons waiting to be picked from the tree. And since it's summer, it's a perfect time to make something refreshing. I made a lemon and mint sorbet! The lemons and mint were freshly picked from the garden on the same day as the sorbet was made. Nothing can be fresher than this!
I've always wanted an ice cream maker and was actually contemplating on getting a Cuisine Art ice cream maker so getting something very similar (if not better!) was much appreciated.
So, of course it had to be tested!
Incidentally there was a bunch of lemons waiting to be picked from the tree. And since it's summer, it's a perfect time to make something refreshing. I made a lemon and mint sorbet! The lemons and mint were freshly picked from the garden on the same day as the sorbet was made. Nothing can be fresher than this!
you calling me a lemon?
this is actually ginger mint
I followed a basic sugar recipe included in the instruction manual. This has to be made ahead.
Sugar Syrup
1 cup water
1 cup caster sugar
Place water and sugar in a small saucepan. Stir over low heat until the sugar dissolves. Bring to the boil and cook for 2 minutes. Remove from heat and allow to cool at room temperature before refrigerating for a few hours or until cold.
Lemon and Mint Sorbet
2 cups lemon juice (around 6 lemons)
zest of 2 lemons
handful of mint, chopped finely (I used some ginger mint as an excuse to pluck some leaves off our plant! and ordinary mint)
1 quantity of sugar syrup
Combine sugar syrup, lemon juice, lemon zest and mint. Cool in fridge for a couple of minutes (this just helps in making the sorbet quicker - just a tip I read from the manual).
The Gelateria needs some prep prior to be being used. It has a fixed cylinder and a removable cylinder inserted into the fixed cylinder. A saline solution (1 tablespoon water and 1 teaspoon salt) has to be poured into the fixed stainless steel cylinder to facilitate the transfer of freezing temperatures from the fixed cylinder to the removable cylinder (where the liquid mixture is poured). The machine also needs 5 minutes to 'chill' prior to making any ice cream/sorbet/gelato.
When the mixture has chilled a bit and the gelateria has chilled as well, pour the mixture onto the ice cream maker, start the paddle motor then sit down and relax for around 35 minutes - check the consistency after around 35 minutes, if you think it's good enough you can stop it, or check when the paddle has started moving the opposite direction. Otherwise just increase the time.
whip it, whip it
looks good
Transfer the mixture using a spatula or wooden spoon onto a freezer safe container and let sit in the freezer for a couple of hours.
Enjoy!
it was awesome - zesty, citrusy and not too sweet!
It's great to make chilled desserts ahead of time - perfect for summer treats! (Next time I will also have some sugar syrup on standby in the fridge!)
Sunday, November 13, 2011
Chocolate and Guinness Cake, again
Just a different take on the chocolate and guinness cake, which I've done several times - the cake base always turns out to be a winner, so the variety is really just in the cake decoration, or additional flavor... like this one's top was brushed with coffee liquer then topped with ganache and decorated with fresh apple mint and mint leaves. And tiny little pieces of colored chocolate. Made with eggs from a colleagues' chooks too!
Friday, November 11, 2011
Black Forest Wannabe
We had a previous celebration a week ago where a friend of ours celebrated their 15th anniversary together. Now this called for a celebration cake - and having downloaded Donna Hay's latest iPad magazine app featuring celebration cakes, it wasn't very difficult to find a recipe from the list, based on the ingredients that I have.
The winner was a black forest cake. The recipe was meant to be for smaller, semi individual serves. However I didn't have the smaller cake tins, so I thought I'd dish out the same amount but use a 12" springform tin instead. And because I didn't have fresh cherries at hand, I had to decorate the top with strawberries, which are widely available this time of the year. I did use tinned cherries, which was covered with the cake batter, before baking.
The great part about this recipe is the chocolate shards - Donna had a very elegant (i.e. not messy!) way of creating the chocolate shards. The magazine had a video to show this, my version are in the photos below.
Prepare 2 sheets of baking paper, around 3 feet long.
Melt 300g of 75% dark chocolate (either bain marie, or microwave) and spread over one piece of baking paper. Leave a couple of centimetres away from the edge.
Place the other sheet of baking paper on top and smooth it out to remove air bubbles.
Roll it out and put in the fridge to set. I used a rolling pin to make it easier although the instructions didn't say so!
When set (maybe an hour or 2 to be sure) hold one end of the bottom baking paper and unroll the top part. This will create the shards.
Sunday, October 30, 2011
Witch's Fingers
We were invited to a Halloween party on Saturday night, and it was great to think about what costume to wear and what treat to bring! There are so many ideas available once you start googling things (there you go, google is a verb) but one thing that I chose was these witch fingers (check out this link for the ingredients) ... basically it's a shortbread base, almonds for nails and a bit of food color for extra effect! I thought they looked sensational so I set off to make a batch of my own.
Heeheeheehee.
I only have small bottles of red, yellow and blue food coloring in my pantry - and I guess that's the most I'll ever need for now as these primary colors can be mixed to create pretty much any color from the spectrum. So blue+yellow=green! (although I did stop to think about it hahahaha)
200 grams of room temperature unsalted butter, cubed + 1/2 cup caster sugar. Into the mixing bowl. I used a paddle attachment and whipped till light and fluffy. Add green food color and a couple of drops of almond essence (be careful not to overdo as it can be quite overpowering)
Pre-heat oven to 190C, and line your baking tray with baking paper.
Mix 1 1/3 cup plain flour, 3/4 cup rice flour and a pinch of salt in a separate bowl. Fold into butter and sugar mixture. You'll have to get in there and use your hands to lightly knead until it comes together. Grab a small handful and shape into fingers. Remember to emphasize the knuckles and the folds of the skin! I used a butter knife to press in some lines. Then lightly press a blanched almond at the tip to make the fingernail.
Line 'em all up and bake for around 10 minutes.
When they're done and still hot (but be careful), remove the almond and tinge the 'cuticle' with red food color to make it a bit more gross! Replace the almond. Be really careful as it's a bit crumbly!
Ready for the party!
The slightly burnt ones are fingers from witches who were set on fire! Hee hee hee!
Happy halloween!
Saturday, October 29, 2011
Saturday Night (cooking) Live, again
Here's another long delayed entry for one of those Saturday feeling-fancy-dining-in nights, which is basically a 3 meal course enjoyed slowly with a bottle (or two) of wine.
The starter was a grilled blue marlin with salsa verde, garnished with sugar snap peas and shoots from the garden. If my memory serves me right, the salsa verde is made of a handful of parsley, 2 sprigs tarragon, 2 sprigs thyme, 1 clove garlic, I think I sneaked in a leaf of kaffir lime as well, 2 pieces anchovy, a teaspoon of baby capers, salt and pepper, blitzed with 1/3 cup of extra virgin olive oil. This is best prepared ahead of time to let the flavors infuse.
Then this was dredged into the herby mixture, until well covered.
And last but not the least... dessert. A chocolate fondant, served with vanilla ice cream. And some left over mint sprigs! :)
This fondant is also another Gordon Ramsay recipe, and something that I've done several times, and works each time. No use altering or making my own version. And this is always a crowd pleaser. Never mind the calories - it's so good it's really worth enjoying!
After writing this I realized that I should probably rename my post to Ramsay Inspired Night!
Ok now I'm off to the gym! :)
The starter was a grilled blue marlin with salsa verde, garnished with sugar snap peas and shoots from the garden. If my memory serves me right, the salsa verde is made of a handful of parsley, 2 sprigs tarragon, 2 sprigs thyme, 1 clove garlic, I think I sneaked in a leaf of kaffir lime as well, 2 pieces anchovy, a teaspoon of baby capers, salt and pepper, blitzed with 1/3 cup of extra virgin olive oil. This is best prepared ahead of time to let the flavors infuse.
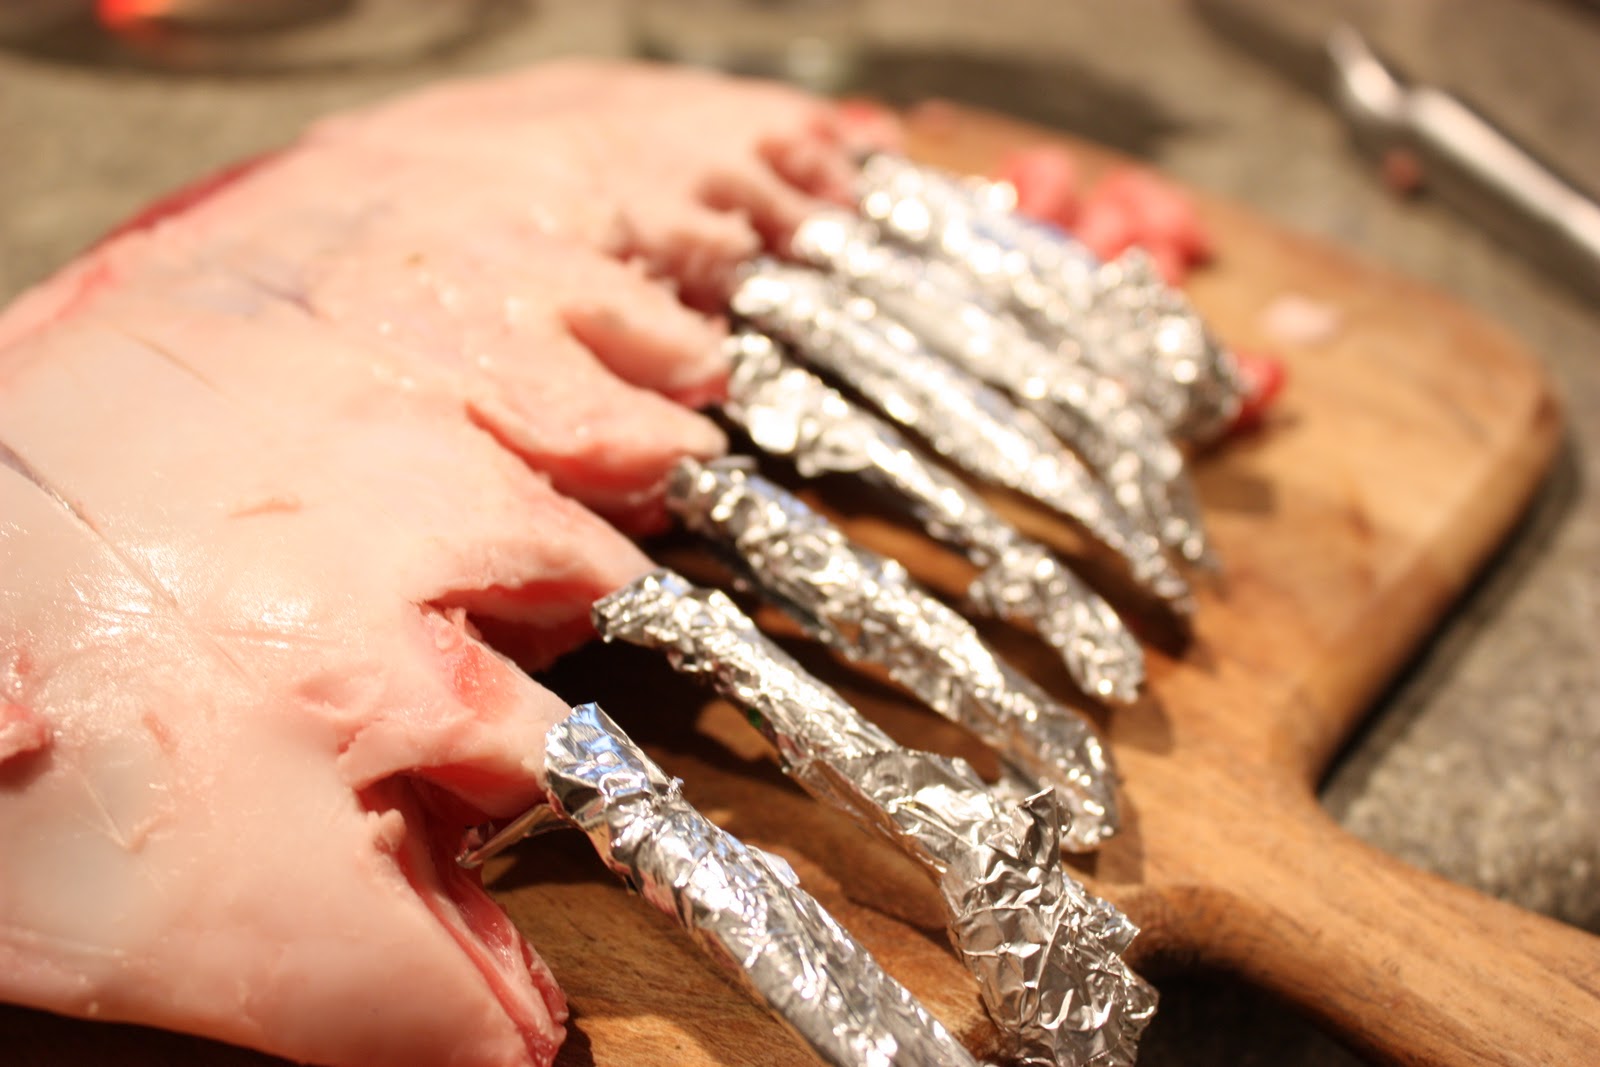
For the main meal, I thought that a rack of lamb was in order as I haven't cooked one for a while! This herb crusted lamb was inspired by a Gordon Ramsay recipe.
I cleaned up the remaining sinews from the bones and wrapped it with foil. Frenching a rack of lamb after a couple of glasses of wine and Santana in the background was a pretty awesome gig :) I also scored the fat and seasoned it with salt and pepper. Meanwhile the oven was pre-heated to 200C.
After the deed is done, the lamb meat is seared on high heat with a touch of olive oil, for around 2 minutes, then it went straight to the oven for around 8 minutes.
While the lamb is in the oven, I pulsed 3 slices of stale wholewheat bread, a handful of parsley, a couple of sprigs of thyme, leaves stripped off from 3 sprigs of rosemary, and some olive oil.
The lamb was taken out of the oven and seeded mustard was slathered across the meaty part.
Then this was dredged into the herby mixture, until well covered.
It was finished off in the oven again for around 5 minutes. We like our lamb still pink in the middle so if you prefer yours well done, you'll need to leave it in there for longer!
The lamb was served with smashed swedes, rocket and silverbeet from the garden, and a mint sauce made from red wine, some sugar, and a handful of minced mint (also from the garden) thickened with a little bit of gelatin (I pretty much winged this recipe so don't ask me about the proportions, as most mint sauces I found online have so much sugar and I don't really want a very sweet mint sauce). This is also best prepared ahead of time to allow for the jelly to set. You just want it with a little wobble and not very solid though!
And last but not the least... dessert. A chocolate fondant, served with vanilla ice cream. And some left over mint sprigs! :)
This fondant is also another Gordon Ramsay recipe, and something that I've done several times, and works each time. No use altering or making my own version. And this is always a crowd pleaser. Never mind the calories - it's so good it's really worth enjoying!
After writing this I realized that I should probably rename my post to Ramsay Inspired Night!
Ok now I'm off to the gym! :)
The Irishman's Birthday Cake
Sorry it's been a while since my last post! I have been a bit pre-occupied with general stuff around the house, at work, and all over the place. Sometimes I wake up on a Monday morning thinking that another week is about to commence, and then all of a sudden it's the weekend, and before I get the chance to relax, it's Monday again! Time flies and sometimes it's not funny - I have so many things to do!
Anyway one of things that I did was to bake a cake for the birthday boy, the resident Irish Man himself. A surprise trip to Mooroolbark airport for an express helicopter flying session did the trick. He liked it! The cake base was from the coles recipe from before. I'm beginning to regularly use this as the cake base for chocolate cakes. And since there are so many ways to dress up a cake, no one can tell the difference sometimes. The frosting for this was a swiss meringue buttercream. I followed this particular recipe that I found in youtube - it looked to be the simplest, no-fuss technique compared to the other ones I've seen. And it turned out to be very good! I used a sparkler instead of a candle for an extra special touch.
Happy birthday mo stor! :)
Sunday, October 2, 2011
Sunday Snapshots
Snapshots one sunny Sunday
Random flower arrangement, all harvested from the garden
Out for morning coffee
Peas
Lemon Verbena
Chocolate Mint
Guess What
Tarragon, growing better than before - the peas within the pot enriches the soil by releasing nitrogen!
Coriander
Little seedlings - tomato, okra, among others!
Today's Lavender harvest
Subscribe to:
Posts (Atom)